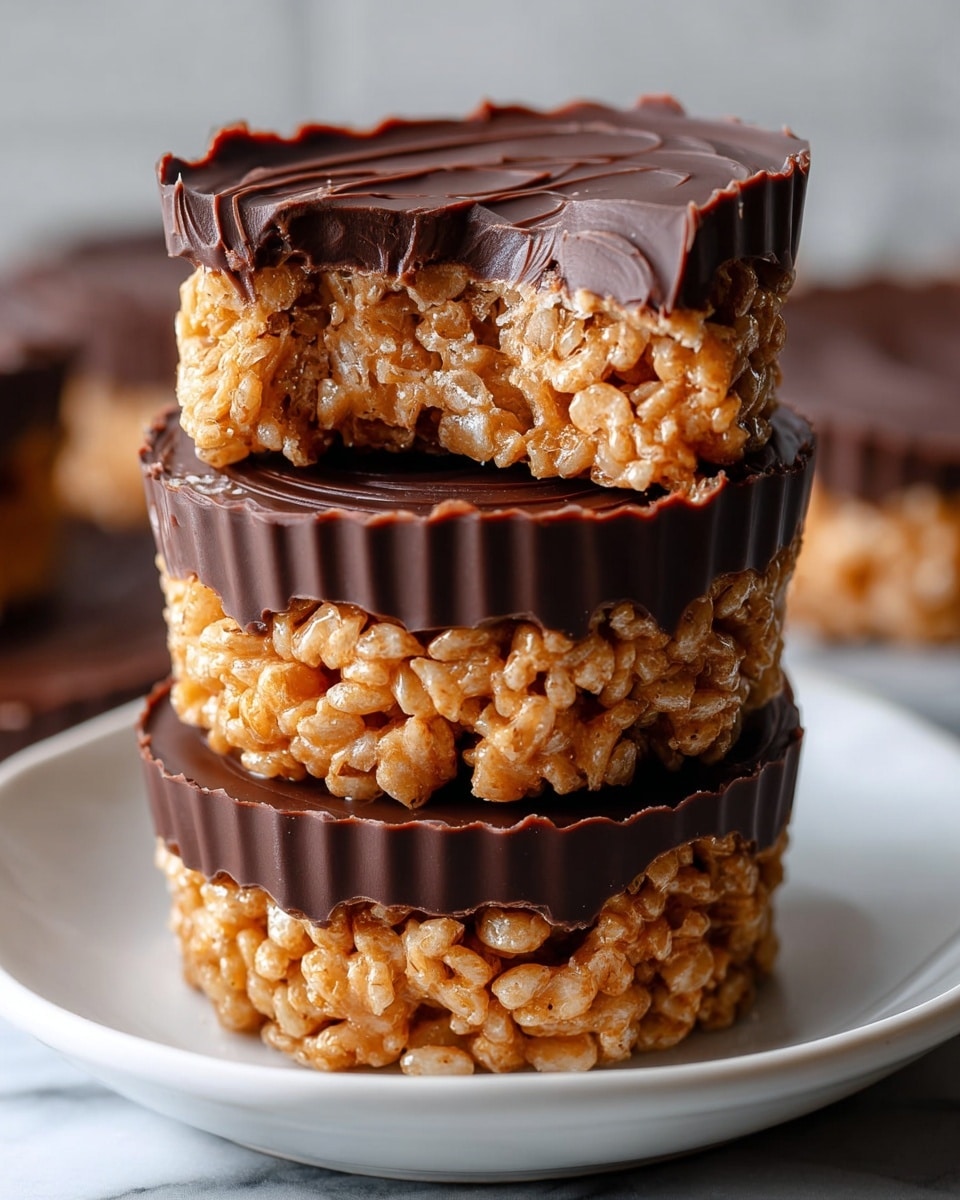
Chocolate Peanut Butter Rice Krispie Cups Recipe
Introduction
These Chocolate Peanut Butter Rice Krispie Cups combine the nostalgic crunch of Rice Krispies with the rich flavors of peanut butter and chocolate. Easy to make and perfect for a quick treat, they’re a delightful twist on classic rice krispie treats.

Ingredients
- 3 cups Rice Krispies cereal
- 1 cup creamy peanut butter
- 1/2 cup unsalted butter
- 1 cup mini marshmallows
- 1 cup chocolate chips
- 1/2 tsp vanilla extract (optional)
- Pinch of sea salt (optional)
Instructions
- Step 1: In a medium saucepan over low heat, melt the butter and mini marshmallows, stirring consistently until the mixture is smooth.
- Step 2: Stir in the peanut butter and vanilla extract (if using) until fully combined and creamy.
- Step 3: Pour the Rice Krispies into a large bowl and gently fold in the peanut butter mixture until all the cereal is evenly coated.
- Step 4: Line a muffin tin with paper liners. Spoon the mixture evenly into each cup and press down gently to create a flat surface.
- Step 5: Melt the chocolate chips in the microwave in 20-second intervals, stirring in between until smooth. Spoon the melted chocolate over each cup and spread evenly. Sprinkle with sea salt if desired.
- Step 6: Let the cups cool at room temperature for about 20 minutes or place them in the refrigerator to set faster. Once firm, remove the paper liners and serve.
Tips & Variations
- For extra crunch, add chopped peanuts or pretzels into the cereal mix before shaping the cups.
- Use natural peanut butter for a less sweet, more intense flavor.
- Try swapping the chocolate chips for white chocolate or butterscotch for a different twist.
- If you prefer gluten-free, ensure your Rice Krispies cereal is gluten-free certified.
Storage
Store the rice krispie cups in an airtight container at room temperature for up to 3 days. For longer storage, keep them in the refrigerator for up to a week. To enjoy, bring them to room temperature or microwave for a few seconds to soften.
How to Serve
Serve this delicious recipe with your favorite sides.
FAQs
Can I use crunchy peanut butter instead of creamy?
Yes, crunchy peanut butter can be used, but the texture will be slightly different with added crunch from the peanut pieces.
What can I use if I don’t have mini marshmallows?
You can use regular marshmallows; just cut them into smaller pieces to help them melt evenly, or substitute with marshmallow fluff, adding it slowly while melting.
PrintChocolate Peanut Butter Rice Krispie Cups Recipe

Delicious and easy-to-make Chocolate Peanut Butter Rice Krispie Cups featuring a buttery marshmallow base, creamy peanut butter, and a rich chocolate topping. Perfect for a sweet snack or dessert, these treats combine crunchy cereal with smooth layers for a delightful texture and flavor balance.
- Prep Time: 10 minutes
- Cook Time: 10 minutes
- Total Time: 20 minutes
- Yield: 12 cups 1x
- Category: Dessert
- Method: Stovetop
- Cuisine: American
Ingredients
Base and Mix:
- 3 cups Rice Krispies cereal
- 1 cup creamy peanut butter
- 1/2 cup unsalted butter
- 1 cup mini marshmallows
- 1/2 tsp vanilla extract (optional)
- Pinch of sea salt (optional)
Topping:
- 1 cup chocolate chips
Instructions
- Melt the Base: In a medium saucepan over low heat, melt the butter and mini marshmallows together, stirring consistently until the mixture is smooth and fully combined.
- Add Peanut Butter: Stir in the creamy peanut butter and vanilla extract, if using, into the melted mixture until it is uniform and creamy.
- Mix with Cereal: Pour the Rice Krispies cereal into a large bowl. Add the peanut butter mixture and gently fold until every piece of cereal is evenly coated with the mixture.
- Shape the Cups: Line a muffin tin with paper liners. Spoon the coated cereal mixture evenly into each liner and press down gently to create flat, compact cups.
- Add Chocolate Layer: Melt the chocolate chips in the microwave in 20-second intervals, stirring between each until smooth. Spoon the melted chocolate over each rice krispie cup, spreading it evenly across the surface. Sprinkle a pinch of sea salt on top if desired.
- Set & Serve: Allow the cups to cool at room temperature for about 20 minutes or refrigerate to speed up the setting process. Once firm, carefully remove the paper liners and serve the cups.
Notes
- For quicker setting, refrigerate the cups after adding the chocolate layer.
- Use paper liners to make removing the cups easier and prevent sticking.
- The vanilla extract and sea salt are optional but add extra depth to the flavor.
- You can substitute almond butter for peanut butter for a different taste.
- Store leftovers in an airtight container for up to a week to maintain freshness.
Keywords: Rice Krispie Cups, Chocolate Peanut Butter Treats, Easy Dessert, No Bake, Snack, Kids Treat