Halloween Lush Recipe
Introduction
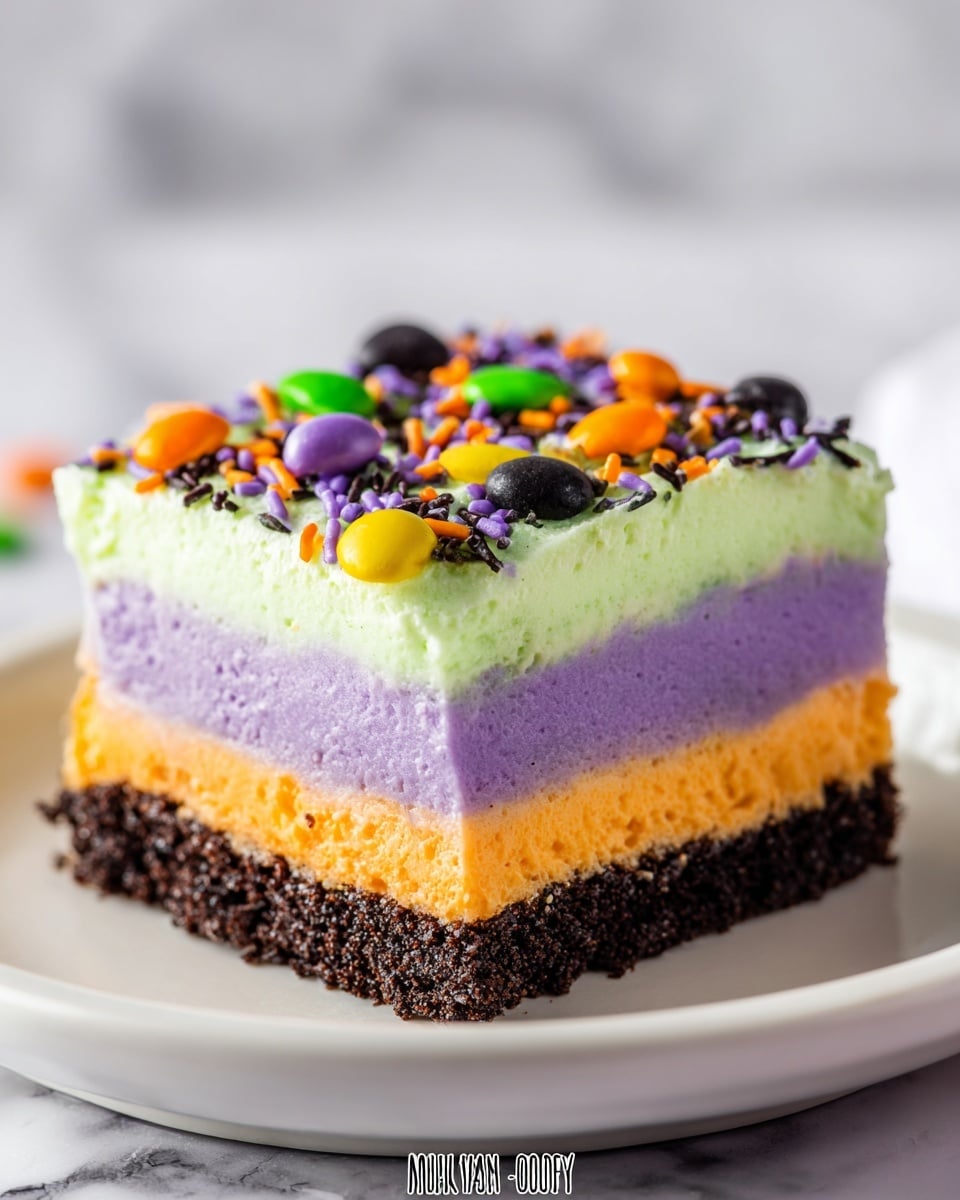
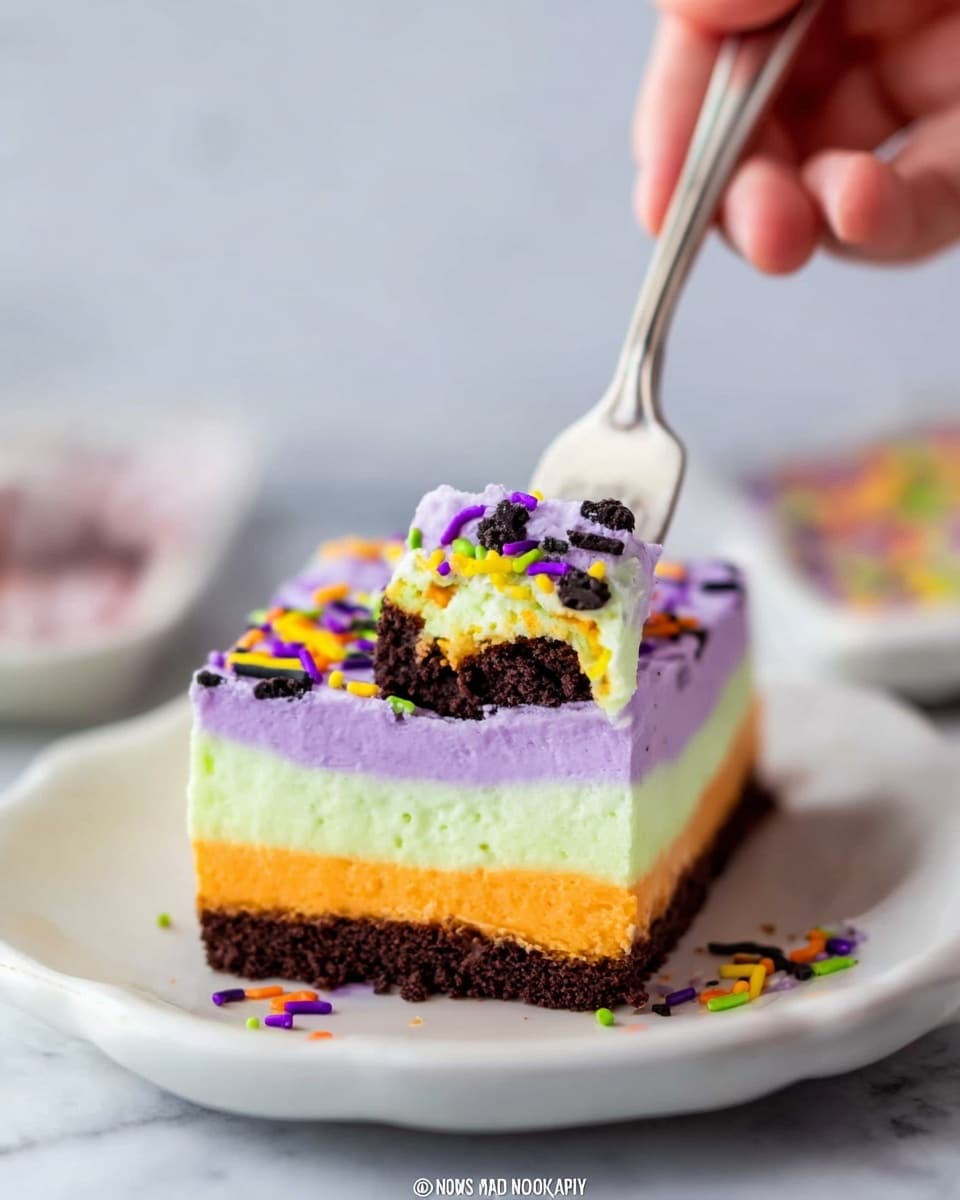
Halloween Lush is a festive and colorful dessert that’s perfect for spooky gatherings. Layers of cookie crust, creamy pudding, and vibrant whipped topping come together to create a deliciously fun treat everyone will love.
Ingredients
- 36 chocolate sandwich cookies
- 6 tablespoons butter (melted)
- 6 ounces orange gelatin
- ⅓ cup boiling water
- 6.8 ounces vanilla instant pudding
- 2 ½ cups cold milk
- 8 ounces cream cheese (softened)
- 1 cup powdered sugar
- 16 ounces whipped topping
- Green and purple food coloring
- Halloween sprinkles
Instructions
- Step 1: Place the chocolate sandwich cookies in a food processor and crush them into fine crumbs.
- Step 2: Transfer the cookie crumbs to a large bowl and stir in the melted butter until well blended.
- Step 3: Press the cookie mixture firmly into the bottom of a 9×13 glass baking dish to form the crust.
- Step 4: Prepare the orange gelatin by placing it in a small bowl and adding the boiling water. Whisk until mostly dissolved and combined.
- Step 5: In a medium bowl, whisk together the vanilla instant pudding mix and cold milk until smooth and slightly thickened.
- Step 6: Stir the orange gelatin mixture into the vanilla pudding until fully combined.
- Step 7: In a large bowl, use an electric mixer to beat the softened cream cheese and powdered sugar together until smooth and creamy.
- Step 8: Fold in 2 cups of the whipped topping, then add a few drops of purple food coloring and mix until you reach your desired purple shade.
- Step 9: Spread the purple cream cheese mixture evenly over the cookie crust in the baking dish.
- Step 10: Carefully spread the orange gelatin and pudding layer over the purple cream cheese layer.
- Step 11: Mix the remaining whipped topping with a few drops of green food coloring until you get your desired green color.
- Step 12: Spread the green whipped topping over the orange gelatin layer.
- Step 13: Sprinkle Halloween sprinkles on top for a festive touch.
- Step 14: Refrigerate the assembled dessert for at least 4 hours to allow it to set fully.
- Step 15: Serve chilled and enjoy your Halloween Lush!
Tips & Variations
- Use gluten-free cookies to make this dessert suitable for gluten-sensitive guests.
- Swap the green and purple food coloring for other festive colors according to your party theme.
- Try adding chopped candy corn or mini chocolate chips in between layers for extra texture.
- For a lighter version, use reduced-fat cream cheese and whipped topping.
Storage
Store Halloween Lush covered in the refrigerator for up to 3 days. For best texture, keep it chilled until ready to serve. If needed, let it sit at room temperature for 10-15 minutes before serving to soften slightly.
How to Serve
Serve this delicious recipe with your favorite sides.
FAQs
Can I make Halloween Lush ahead of time?
Yes, this dessert is perfect for making a day ahead. Just refrigerate it for at least 4 hours or overnight to allow the layers to set.
Can I use fresh whipped cream instead of whipped topping?
Yes, you can whip fresh cream yourself for a fresher taste, but whipped topping helps keep the layers stable and easier to spread.
PrintHalloween Lush Recipe

Halloween Lush is a vibrant, no-bake layered dessert featuring a crunchy chocolate cookie crust, creamy purple-tinted cheesecake layer, a bright orange gelatin pudding filling, and a festive green whipped topping. Perfect for Halloween gatherings, this dessert combines delightful textures and colors to bring spooky fun to your table.
- Prep Time: 20 minutes
- Cook Time: 0 minutes
- Total Time: 4 hours 20 minutes
- Yield: 12 servings 1x
- Category: Dessert
- Method: No-Cook
- Cuisine: American
Ingredients
Crust
- 36 chocolate sandwich cookies
- 6 tablespoons butter, melted
Orange Gelatin Layer
- 6 ounces orange gelatin
- ⅓ cup boiling water
Vanilla Pudding Layer
- 6.8 ounces vanilla instant pudding mix
- 2 ½ cups cold milk
Cream Cheese Layer
- 8 ounces cream cheese, softened
- 1 cup powdered sugar
- 16 ounces whipped topping, divided
- Green and purple food coloring
Garnish
- Halloween sprinkles
Instructions
- Crush Cookies: Using a food processor, crush all the chocolate sandwich cookies into fine crumbs to form the base crust.
- Mix Crust: Transfer cookie crumbs into a large bowl and stir in the melted butter until all crumbs are evenly coated and blend together.
- Press Crust: Press the cookie crumb mixture firmly into the bottom of a 9×13-inch glass baking dish to form an even crust layer.
- Prepare Gelatin: In a small bowl, add the orange gelatin powder and pour in boiling water. Whisk until the gelatin is fully dissolved.
- Make Pudding: In a medium bowl, whisk together the vanilla instant pudding mix and cold milk until thickened and smooth.
- Combine Gelatin and Pudding: Pour the dissolved orange gelatin into the pudding and whisk until fully combined to create a vibrant orange pudding layer.
- Mix Cream Cheese Layer: In a large bowl, beat softened cream cheese and powdered sugar together using an electric mixer until smooth and creamy.
- Add Whipped Topping to Cream Cheese: Fold in 2 cups of whipped topping gently until well incorporated into the cream cheese mixture.
- Add Purple Coloring: Stir in a few drops of purple food coloring until the cream cheese layer achieves your desired shade of purple.
- Spread Cream Cheese Layer: Evenly spread the purple cream cheese mixture over the prepared cookie crust base.
- Layer Orange Pudding: Carefully spread the orange gelatin-pudding mixture evenly over the cream cheese layer.
- Prepare Green Whipped Topping: Mix the remaining 14 ounces of whipped topping with a few drops of green food coloring until the desired green color is reached.
- Top with Green Whipped Topping: Spread the green-tinted whipped topping evenly over the orange gelatin layer for a festive finish.
- Decorate: Sprinkle Halloween-themed sprinkles over the top layer for a fun and festive look.
- Chill: Refrigerate the entire dessert for at least 4 hours to allow it to set properly and flavors to meld.
- Serve: Once chilled and set, cut into squares and serve to enjoy this colorful Halloween treat.
Notes
- This dessert is no-bake, making it easy and quick to prepare for parties.
- Use a food processor to get fine cookie crumbs for a compact crust.
- Make sure the cream cheese is softened to avoid lumps in the creamy layer.
- Chilling time is essential to let layers set properly and blend flavors.
- Customize food coloring amounts to adjust colors based on preference.
- Store any leftovers covered in the refrigerator for up to 3 days.
Keywords: Halloween dessert, no-bake dessert, layered dessert, cream cheese dessert, gelatin pudding, festive dessert