Kinder Bueno Cheesecake Recipe
Introduction
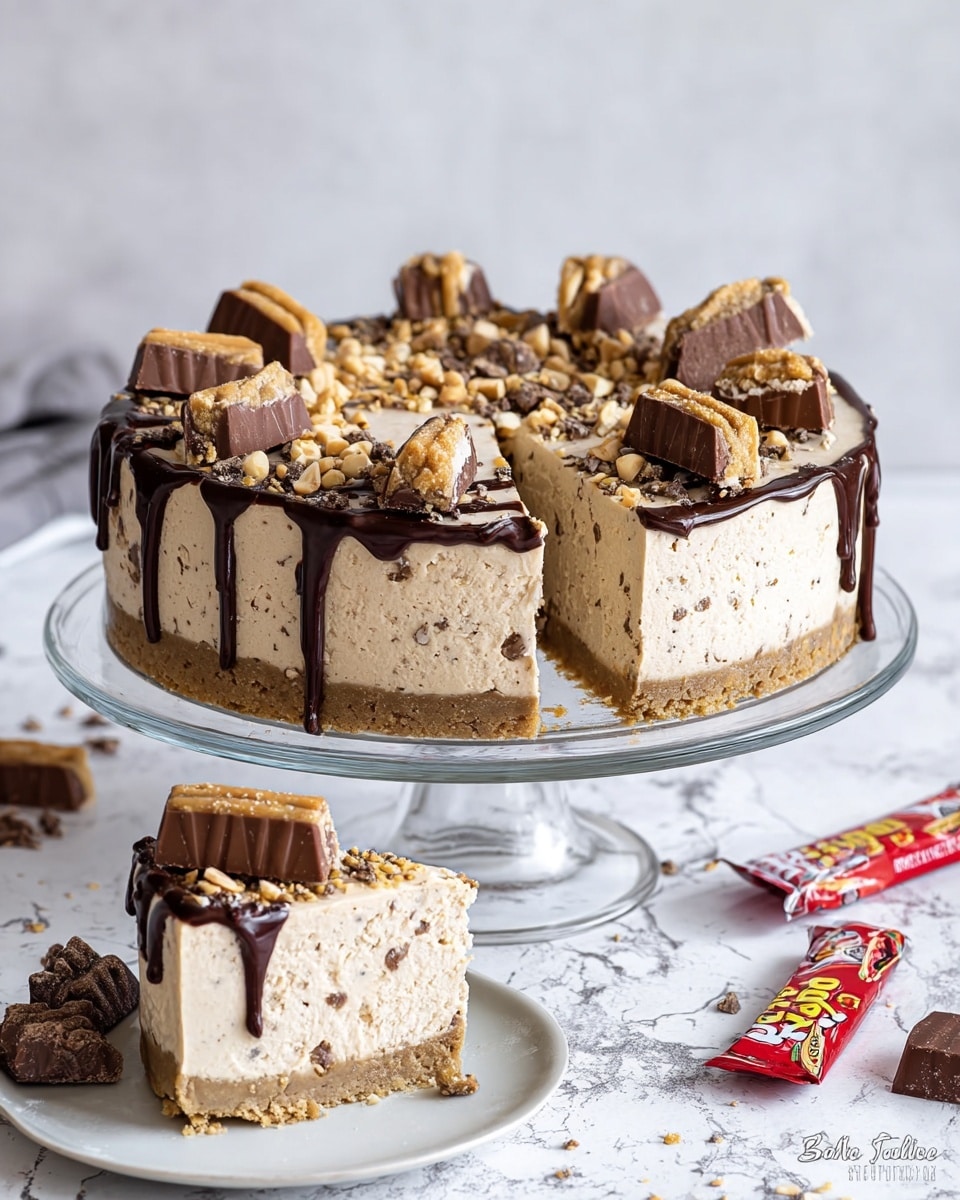
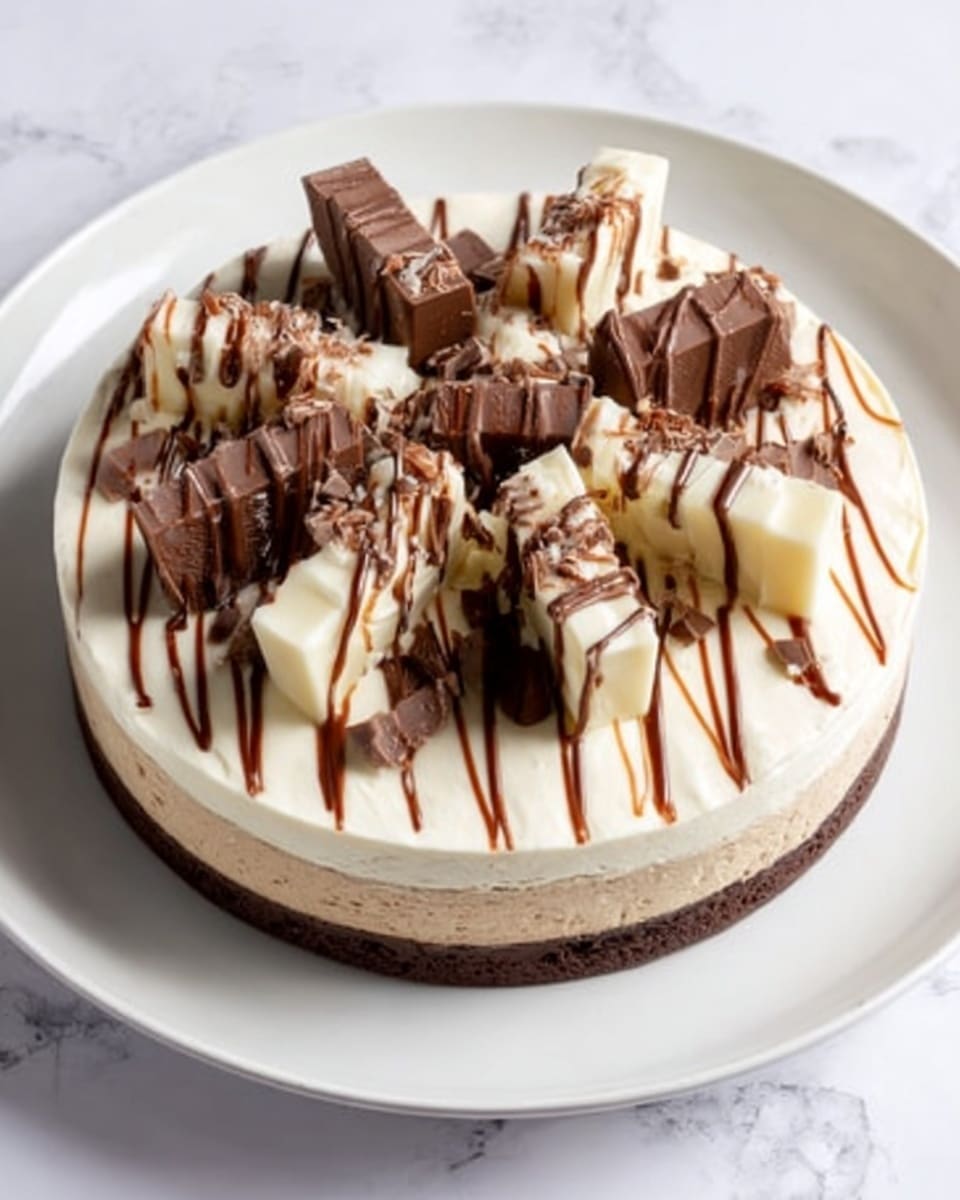
This Kinder Bueno Cheesecake is a creamy, indulgent dessert perfect for chocolate lovers. Combining a crunchy biscuit base with a smooth chocolate filling and decorated with Kinder Bueno bars, it’s sure to impress at any gathering.
Ingredients
- 300 g Digestive Biscuits
- 130 g Unsalted Butter
- 600 g Cream Cheese or Soft Cheese
- 300 ml Double Cream
- 100 g Icing Sugar
- 300 g Kinder Chocolate
- 1 tsp Vanilla Extract
- 25 g White Chocolate
- 25 g Milk Chocolate
- 1 White Kinder Bueno Bar
- 1 Milk Kinder Bueno Bar
Instructions
- Step 1: Line the base of a springform tin with parchment paper to prevent sticking and set aside.
- Step 2: Crush the digestive biscuits into fine crumbs using a rolling pin inside a freezer bag or pulse in a food processor.
- Step 3: Melt the unsalted butter in the microwave, then combine it with the biscuit crumbs in a mixing bowl, mixing well to coat evenly.
- Step 4: Press the biscuit mixture firmly into the base of the prepared tin using the back of a spoon to create an even layer. Chill in the refrigerator while preparing the filling.
- Step 5: Gently melt the Kinder chocolate until smooth, then set aside to cool slightly so it doesn’t harden before mixing.
- Step 6: In a large bowl, whisk together the cream cheese, double cream, and icing sugar on high speed until soft peaks form and the mixture thickens.
- Step 7: Pour the melted Kinder chocolate and vanilla extract into the cream mixture and whisk until fully incorporated and smooth.
- Step 8: Pour the filling over the chilled biscuit base and smooth the top with an offset spatula. Refrigerate for at least 6 hours or overnight for best results.
- Step 9: Melt the white and milk chocolates separately. Drizzle the milk chocolate over the set cheesecake, followed by the white chocolate to create a marbled effect.
- Step 10: Arrange the white and milk Kinder Bueno bars alternately around the edge of the cheesecake for decoration and serve chilled.
Tips & Variations
- For extra crunch, add crushed hazelnuts to the biscuit base mixture.
- Use full-fat cream cheese for a richer texture and flavor.
- Allow the melted chocolate to cool slightly before folding into the cream mixture to avoid curdling.
- Swap Kinder Bueno bars for your favorite chocolate bars if desired.
Storage
Store the cheesecake covered in the refrigerator for up to 3 days. Reheat is not recommended; serve chilled for the best texture and flavor. If needed, cover tightly with plastic wrap or an airtight container to prevent drying out.
How to Serve
Serve this delicious recipe with your favorite sides.
FAQs
Can I use a different type of biscuit for the base?
Yes, you can substitute digestive biscuits with graham crackers or any other neutral-flavored biscuit. Just ensure they are crushed finely for a good base texture.
Do I need to bake this cheesecake?
No, this is a no-bake cheesecake that sets in the refrigerator, making it simple and quick to prepare without the need for an oven.
PrintKinder Bueno Cheesecake Recipe
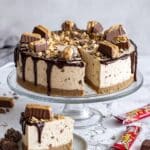
This Kinder Bueno Cheesecake is a decadent no-bake dessert combining a crunchy digestive biscuit base with a rich, creamy filling infused with melted Kinder chocolate. Topped with marbled drizzles of white and milk chocolate and decorated with whole Kinder Bueno bars, this cheesecake is an indulgent treat perfect for chocolate lovers seeking a smooth and velvety texture without the need for baking.
- Prep Time: 25 minutes
- Cook Time: 0 minutes
- Total Time: 6 hours 25 minutes (including chilling time)
- Yield: 8 servings 1x
- Category: Dessert
- Method: No-Cook
- Cuisine: European
- Diet: Vegetarian
Ingredients
Base
- 300 g Digestive Biscuits
- 130 g Unsalted Butter
Filling
- 600 g Cream Cheese or Soft Cheese
- 300 ml Double Cream
- 100 g Icing Sugar
- 300 g Kinder Chocolate
- 1 tsp Vanilla Extract
Decoration
- 25 g White Chocolate
- 25 g Milk Chocolate
- 1 White Kinder Bueno Bar
- 1 Milk Kinder Bueno Bar
Instructions
- Prepare the Base: Line the base of a springform tin with parchment paper to prevent sticking and set it aside. This will form the foundation for your cheesecake.
- Crush the Biscuits: Place the digestive biscuits in a freezer bag and crush them into fine crumbs using a rolling pin or pulse until fine in a food processor. This creates the texture needed for a firm base.
- Combine Base Ingredients: Transfer the biscuit crumbs into a mixing bowl, melt the unsalted butter in the microwave, and pour it over the crumbs. Mix well to coat the crumbs evenly with butter.
- Form the Base: Press the biscuit and butter mixture firmly into the base of the prepared springform tin using the back of a spoon to create an even layer. Chill the base in the refrigerator while preparing the filling.
- Melt the Chocolate: Gently melt the Kinder chocolate until smooth. Set aside to cool slightly but ensure it doesn’t harden before being mixed into the filling.
- Whisk the Filling: In a large mixing bowl, whisk together the cream cheese, double cream, and icing sugar on high speed until the mixture thickens to soft peaks, resembling meringue texture with visible ripples.
- Combine Chocolate and Flavor: Pour the melted Kinder chocolate into the whipped filling along with the vanilla extract. Use an electric whisk to mix until the chocolate is evenly incorporated, forming a smooth chocolate cream filling.
- Assemble Cheesecake: Pour the cheesecake filling over the chilled biscuit base in the springform tin. Smooth the top evenly with an offset spatula. Refrigerate for at least 6 hours, preferably overnight, allowing it to set and develop flavor.
- Decorate the Cheesecake: Melt the white and milk chocolates separately in microwavable bowls. Using teaspoons, drizzle the milk chocolate followed by the white chocolate over the chilled cheesecake, creating a marbled effect on the surface.
- Top with Kinder Bueno Bars: Arrange the white and milk Kinder Bueno bars alternately around the edge of the cheesecake as a decorative and delicious finishing touch before serving.
Notes
- This is a no-bake cheesecake, so proper chilling is essential for setting.
- If you don’t have Kinder chocolate, you can substitute with any good quality milk chocolate, but the flavor will differ.
- For best texture, use full-fat cream cheese and double cream.
- Keep the cheesecake refrigerated until serving to maintain its shape and creaminess.
- Use gentle heat when melting chocolates to avoid burning or seizing.
Keywords: Kinder Bueno Cheesecake, no bake cheesecake, chocolate cheesecake, dessert, kids dessert, creamy cheesecake, chocolate dessert